
In Flowable 6.5.0 a new engine has been added: the Flowable Event Registry. This enables the receiving and sending of events from any source, with out-of-the-box support for JMS, Kafka and RabbitMQ. In addition, receiving events is possible through HTTP. This article describes how to start using the Event Registry using the open source Flowable Modeler and Task application and Apache ActiveMQ to be able to receive and send JMS messages.
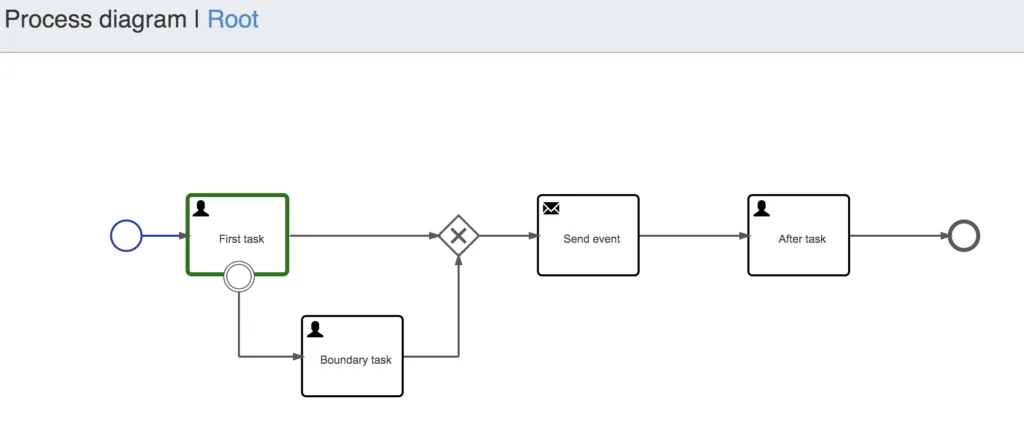
Let’s begin by designing a BPMN process with the Flowable Modeler using an Event Registry start event.
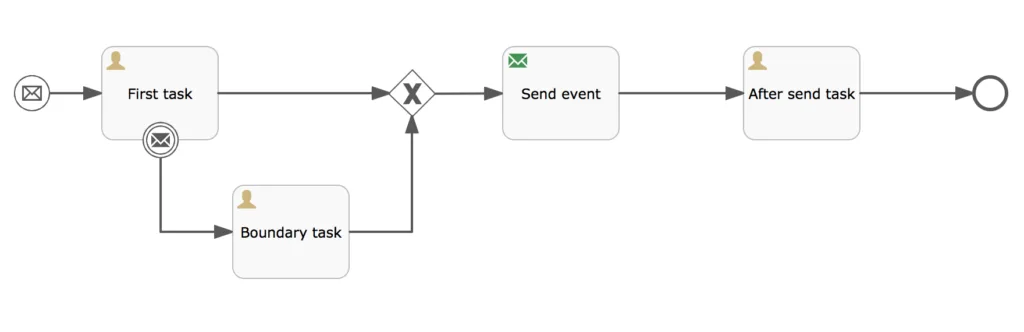
When an event is received, the First task user task is the next step in this example BPMN process. But let’s begin by looking at the configuration of the start event.

The first part is the definition of the event key and name that identifies the incoming event. It’s also necessary to define the channel key and name. In this example, the event will be received on a JMS queue with the name testQueue. The last part is the configuration of the event payload parameters, which defines how the event parameter values are mapped to process variables.
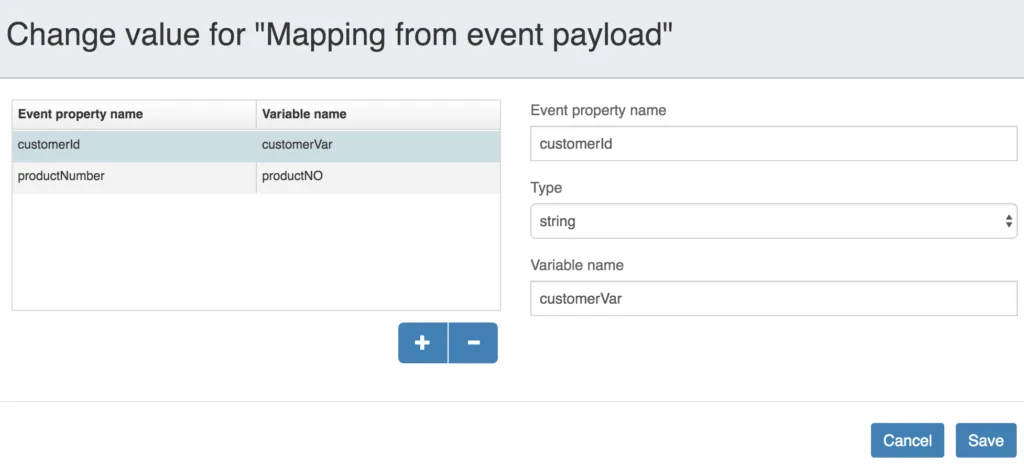
In this example, two event parameters, customerId and productNumber, will have their values mapped to process variables. In the event payload dialog it’s shown that the customerId parameter is mapped to the customerVar variable and the value is of type String. This means that, in the process instance context, the customerVar and productNO variables will be available.
When the process instance is started with the myEvent event message, the first wait state is the user task First task, which has a boundary event registry event attached to it. This means that when an appropriate event is received through the event registry, the boundary message will be triggered and executed. When this happens, the user task will be cancelled and the next user task Boundary task will be created. Let’s look at the configuration properties of this boundary event’s registry details.

As you can see, the configuration is similar to the start event we discussed before. In this example, a boundaryEvent event is expected to arrive at the boundaryQueue JMS queue. The main difference is the correlation parameters configuration. When multiple process instances of this example process definition are running, how can an incoming boundaryEvent message be matched against one of the running process instances? This is what is defined by the correlation parameters.

In the boundaryEvent event message, a customerId property value is required and is matched against the customerVar variable of the process instance. This variable value was set by the event message that started the process instance. In this case, only one correlation parameter has been configured, but it’s also possible to have multiple correlation parameter values that need to be matched.
Under the covers, in the engine this is achieved with event subscriptions similar to a message and signal event. When the First task user task is reached, then the boundary event’s registry event logic will create an event subscription using the correlation parameter values in the configuration value of the event subscription. When a new boundaryEvent message is received from the BoundaryQueue JMS queue, the event is matched against an event subscription that listens to the boundaryEvent event type and a configuration value that is equal to the customerId event property value.
The final task to be discussed in this process model is the Send event task. The type of this task is the same as the name it’s given in this example: a Send event task. This task can be used to send out an event to the event registry with a JMS, Kafka or RabbitMQ destination. In addition, it’s possible to wait for a response to the outgoing event as an incoming event, similar to the start event and boundary event we discussed before. This is also like the triggerable service task that’s been available in Flowable since version 6.4.0.

For the outgoing event example above, a message is sent to the sendQueue JMS queue, and it has one event property defined in its payload.
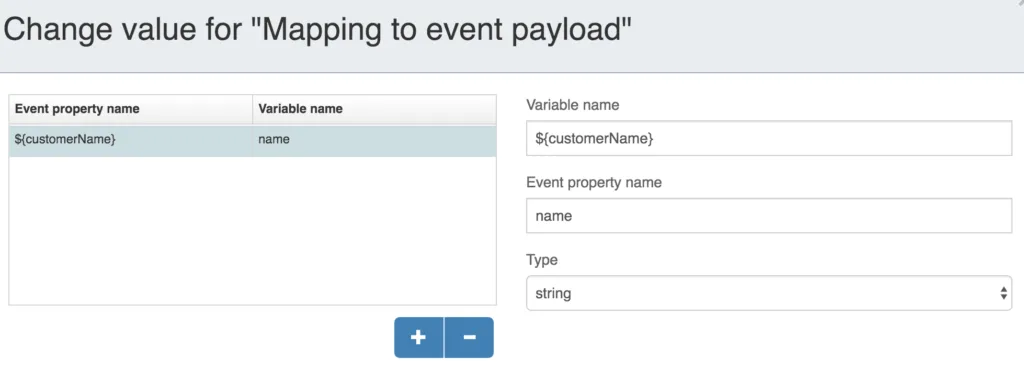
The customerName variable will be sent in the event payload with a property of name. In this example we will also wait for a response event message before continuing to the last task in the process model.
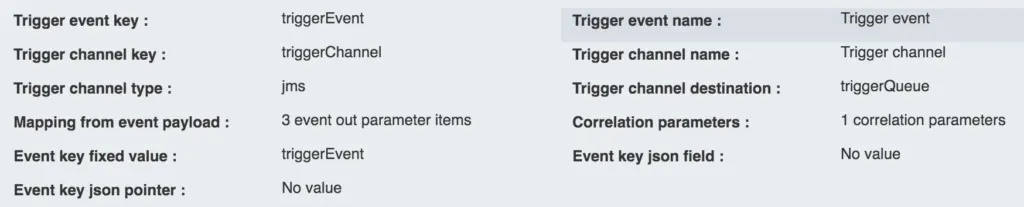
For this, an event of type triggerEvent is expected to arrive on the triggerQueue JMS queue. With the given correlation parameters, again we expect a customerId event property to match the customerVar process variable, just as it was for the boundary event. Additionally, two event properties will be set as process variables: the event property productName will be set as a process variable, product, and the event property amount will be set as productAmount. After receiving and processing this event, the last user task After send task will be created.
With the process modeled, we can now start to create a process instance and test the process model. Make sure that the following Spring properties are set for the Flowable Task application (for example in the flowable-default.properties file or an application.properties file on the classpath):
#Enable and configure JMS
flowable.task.app.jms-enabled=true
spring.activemq.broker-url=tcp://localhost:61616
If you don’t have Apache ActiveMQ installed, then download it from http://activemq.apache.org/components/classic/download/. You can start it with the activemq.sh or activemq.bat scripts in the bin folder of the Apache ActiveMQ installation.
Now let’s start the Flowable Task application and create an app model in the Flowable Modeler, adding the example process model to the newly created app. In the app details view you can then publish the app to the Flowable Task application. This will deploy the example process model to the BPMN engine, and the event registry start event will create an event subscription. In addition, it will automatically create a JMS listener to the testQueue JMS queue.
Now we can send an event message to the testQueue. Apache ActiveMQ provides a web console that allows us to send and read messages from a JMS queue. Open a browser and go to the http://localhost:8161/admin/ page. The default login is admin/admin. Now click on the Queues tab and lookup the testQueue in the list. It should have been automatically created by Apache ActiveMQ. On the right hand side there’s a Send to action link that opens a view where we can enter the event message content. Remember that the start event expects an event message with a customerId and productNumber event property. In the message body, let’s fill-in the following JSON message and click the Send button:
{
   "customerId": "123455",
   "productNumber": "flw123"
}
In the Flowable Task application, navigate to the application you deployed from the Flowable Modeler and you should see a task with a name of First task in the task list. In the processes list there should also be one new process instance and the diagram should look like this:
We can now trigger the boundary event by sending an event message to the boundaryQueue JMS queue. The customer id value should be the same as the value that we sent with the start event message, to match the correlation configuration. Let’s first send a message with a different customerId value.
{
   "customerId": "123456",
   "customerName": "John Doe"
}
You can use the ActiveMQ web console again, and this time send it to the boundaryQueue. As you will see when refreshing the Flowable Task application task list view, nothing has happened with the process instance state. Now let’s trigger the boundary task with a matching customerId value.
{
   "customerId": "123455",
   "customerName": "John Doe"
}
This time the correlation parameter matches and the process instance moves on to the Boundary task user task. Just complete this task in the Flowable Task application and now the send event task will send out an event message to the sendQueue JMS queue containing the name value. You can see the message content by clicking on the sendQueue link in the ActiveMQ web console and selecting the message in the list.
Now we have one event message left, which should trigger the send event task to continue to the last user task in the process definition. An event message containing the customer id, product name and amount needs to be sent to the triggerQueue with the customer id matching the correlation value of the running process instance.
{
"customerId": "123455",
"productName": "Flowable lego block",
"amount": 10
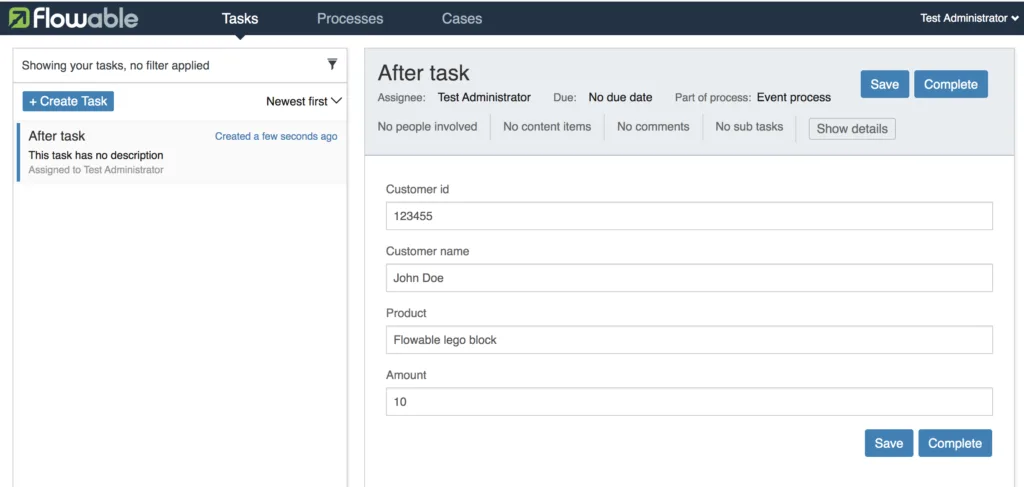
}Again, send it using the ActiveMQ web console and check if the After send task is available in the Flowable Task application. This time, the user task also has a form attached to it, showing the process variables from the event messages that we sent.
This completes the overview of how to use the new event registry functionality with a BPMN process example. In a next article we will have a look at how we can do something similar, but using a CMMN case example together with the event registry.

Tools like ChatGPT can handle a variety of business tasks, automating nearly everything. And it’s true, GenAI really can do a wide range of tasks that humans do currently. Why not let business users work directly with AI then? And what about Agentic AI?

In this post, we continue our exploration of workflow complexity - learn how key metrics like activity count and control flow reveal natural groupings of models, making it easier to identify and improve overly complex designs.

In this post, we continue our exploration of workflow complexity - learn how key metrics like activity count and control flow reveal natural groupings of models, making it easier to identify and improve overly complex designs.